Radiography Part 3
The previous two articles dealt with what may be termed conventional radiographic techniques employing either gamma- or X-ray sources and photographic film. The development of electronics, in particular the increase in computing power over the last 20 or 30 years, has enabled what were laboratory based radiographic methods – real time radiography and computerised tomography (the “CT” scan that is perhaps more familiar in a medical context) -to be implemented both on the shop floor and on site.
The fundamental difference between film radiography and real time radiography is the way in which the radiographic image is handled – the image in real time radiography being produced electronically rather than on film. This means that the image can be viewed, as the name suggests, in real time – an instant result rather than the significant time delay that occurs when radiographic film is carried to a darkroom, developed and dried before viewing can take place. The real time image is viewed on a monitor screen and the results can be stored and transmitted electronically. An additional difference from film radiography is that the image is a positive rather than the negative image of film radiography, denser materials transmitting less radiation and therefore appearing darker and hence voids, slag entrapment, porosity etc show as light areas in a welded joint.
The early real time radiographic equipments used a fluorescent screen which interacted with the x-ray radiation to produce an image that was then passed through an image intensifier. This enabled a video film to be produced and the image to be displayed on a monitor screen in real time. Developments in computing power now enable the image to be digitised and enhanced and then analysed. Comparison with a set of pre-programmed parameters e.g. an acceptance standard, enable the process of inspection and acceptance/rejection to be automated.
The X-ray source has been progressively reduced in size such that the focal spot is now as small as 2 or 3 microns and with micro-focus units to as small as 0.1mm, again resulting in improved image quality. These features also enable the image to be enlarged with magnifications of over 1000 times being available with little or no loss in image quality. Real time radiography is employed in applications where a rapid in-production inspection is required. It has found extensive use in the electronics industry for the in-line examination of circuit boards, in the aerospace and automotive industries for the examination of castings and, often using gamma ray sources, in the process industry for the detection of corrosion. By moving the component between the X-ray source and the detector screen seam welded tube and tube butt welds can be inspected.
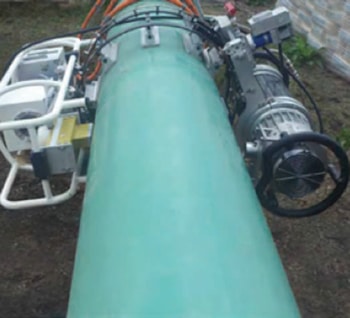
Robust, portable manipulating equipment is commercially available for the on-site examination of process pipework and crosscountry pipelines. Orbiting heads carrying both an X-ray source
and, diametrically opposed, the detection screen, are capable of radiographing pipe butt welds with a substantial reduction in time compared with a conventional film radiograph, particularly where multiple exposures are required to give full coverage of the weld. The head rotates around the pipe to give a DWSI (double wall single image) with very high resolution and good contrast. Internal crawlers equipped with a rotating X-ray head and an external detector can be used to provide a SWSI (single wall single image) radiograph. The examination results are instantly available for display on a laptop screen, the images being stored on disc or memory stick. No film processing or darkroom are required resulting in a further reduction in cost. A typical commercially available unit is illustrated in Fig 1.

Computed tomography (CT) is a process that uses the techniques of real time radiography to produce three dimensional, rather than two dimensional, images of components. Both the external surfaces and the internal structures of an item can be imaged. All materials – metals, plastics, composites, rocks, fossils, the human body – can be scanned, making CT scanning a very powerful investigatory and diagnostic tool. Industrial CT scanning is used in many applications for the internal inspection of components, metrology, and for reverse engineering.
The earliest CT units utilised an X-ray beam collimated to create a fan shaped beam of radiation which is scanned across the item, the beam being collected at the detector screen. The signal is then manipulated by a powerful software programme, enabling a 3D image to be created. The technique was further improved when the fan shaped beam was replaced by a cone shaped beam.
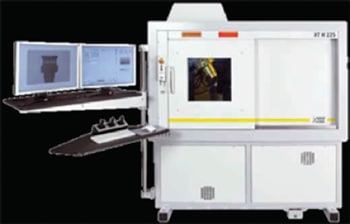
Rotating the part beneath the beam enables a sequence of 2D images to be obtained, generally between 360 (one image per degree) to 3,600 images, depending on the desired resolution, with scanning of the object being completed in as little as a few seconds. The images are subsequently combined using complex software to provide a 3D image of the item, the image containing all of
the information relating to both the external and internal surfaces of the component. A typical commercially available 225Kv microfocus unit is shown in Fig. 2.

The 3D image can be manipulated to provide slices through the object and these slices can be rotated so that the precise size and position of internal features can be accurately determined. Assembly or machining errors can be identified. Similarly, flaws within a welded joint or casting can be categorised and the size and position of inclusions, lack of fusion, cracks etc accurately measured, thus allowing an accurate Engineering Critical Assessment (ECA) to be carried out. The method can also be used to examine non-metallics – a couple of examples being the inspection of composite wind turbine blades for delaminations and the positioning of the cores in lost wax casting. The technique can also be used for accurate measurement of the internal and external surfaces of a component, the image being capable of being overlaid on a CAD drawing of the object. This is particularly useful where parts are provided by a number of suppliers to a manufacturer for subsequent assembly. The items can be checked against a CAD drawing before despatch and, if required, the manufacturer instantly provided with the results, thus reducing the risk of being supplied with non-fitting parts.
Unfortunately, unlike real time radiography that has moved from being a non-portable method to construction site use, CT scanning requires the use of a protective enclosure containing the X-ray source, the detector screen and a precision turntable. The method is currently therefore confined to within a factory or laboratory environment.
The final radiographic method is neutron radiography. Neutrons, like X- and gamma-radiation, will pass through solid materials and can be used to produce an image on photographic film or to react with a detector screen. Neutrons, however, unlike X- and gamma radiation, are strongly affected and absorbed by certain elements such as hydrogen, carbon and boron but to a far lesser extent by iron, nickel and aluminium. Neutron radiography is therefore useful in detecting the presence of material containing hydrogen or hydrocarbons – this includes corrosion products, water, explosives, oil and plastics. Composite items e.g. a combination of metal and plastic, can be non-destructively examined for assembly faults or manufacturing defects; explosive ordnance can be examined for complete filling and fluid flow analysis can be carried out in real time – oil flow in vehicle engines, fluid flow in piping systems.
Neutron radiography can be used with conventional film with real time techniques and for CT scanning. The neutrons are produced by particle accelerators or, with poorer image definition, from certain isotopes, primarily californium252. The method is currently not portable but development work is in progress to address this limitation.
This article was written by Gene Mathers.
