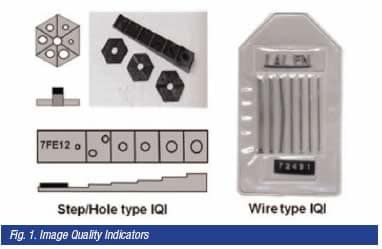
The previous article dealt mostly with the basic principles of radiography – this part will cover the methods of ensuring that a radiograph is of an acceptable quality and capable of showing relevant imperfections. As mentioned in the previous article the quality of a radiograph is assessed using three factors: density, contrast and definition or sharpness of the image. Density and contrast have already been covered but there also has to be some method by which the sensitivity (the ability to reveal imperfections) can be measured. To do this devices known as image quality indicators (IQI’s) are used. These can be of several forms as illustrated in Fig.1
The wire type is the most frequently used IQI in radiography-by-film. The design of the IQI is given in EN ISO 19232 Part 1 or ASTM E747. Both specifications list a series of IQIs containing six or seven wires of increasing diameter, from 1-8mm, from 10-50mm in length and in a range of metals – iron, nickel, aluminium, magnesium, copper and titanium. The wires are mounted side by side in a flexible plastic sheath which also carries appropriate identification, generally lead letters that will be clearly seen on the radiograph. The IQI is selected with respect to the metal type and the component thickness; the thicker the component the thicker the IQI’s wires. The IQI carries an identification and serial number so that it can be confirmed at a later stage that the correct IQI has been used.
Ideally the IQI is placed on the source side of the component and, in the case of a weld, transversely across the joint although this is not always possible when radiographing pipe and tube butt welds. The sensitivity is taken as the smallest diameter wire that can be seen divided by the component thickness, expressed as a percentage. Most application codes specify a sensitivity of between 2-4%; this is a maximum, the smaller the figure the greater the sensitivity of the radiograph. Alternatively an actual wire diameter that must be visible is specified.
The step hole IQI is used less frequently. It is a stepped wedge with a hole drilled in each step, the hole diameter matching the thickness of the step. As with the wire IQI, the material and dimensions of the step wedge are selected to match the application. The diameter of the smallest hole visible on the radiograph determines the sensitivity, this being calculated as hole diameter divided by component thickness expressed as a percentage. The sensitivity measured by the use of a wire IQI is not the same as the sensitivity using a step wedge IQI.
As with any film, the method of processing will affect the quality of the image. Care must be taken to ensure that there is no light contamination, the processing chemicals are at the correct
concentrations and temperatures and that drying the film does not leave marks and stains that would leave spurious indications and would make accurate interpretation difficult.
Interpretation of the radiographs must be undertaken by trained and experienced radiographers. In addition to being fully conversant with radiographic techniques such individuals should also have a comprehensive knowledge of welding processes, joint design and the various imperfections that may occur. Many application specifications require such individuals to be independently certified to a suitable certification scheme such as PCN, administered by the British Institute for NDT or CSWIP, administered by TWI Certification Ltd. Viewing should be carried out in a darkened room, allowing a period of time for the viewer’s eyes to be accustomed to the conditions. The luminance of the viewing screen will need to vary with the density of the radiograph –
there is generally a rheostat control (a dimmer switch) on the viewer to enable the luminance to be varied. The light itself should be white and diffuse and there should be as little light as possible leaking around the edges of the radiograph.
Radiography of flat plates and cylinders large enough to permit entry for placement of the film is a relatively simple operation, as shown in Fig. 1 of the previous article. Lead numbers are placed at fixed intervals along the plate adjacent to the weld or around the circumference of a pipe to enable the position of any imperfections to be accurately located. The weld also carries a unique identification number reproduced on the radiograph by the use of lead figures placed adjacent to the weld.
Radiography of pipes, however, where access to the bore to place the film is not possible presents some problems and terms such as SWSI and DWSI are used as shorthand to identify the various techniques that may be used.
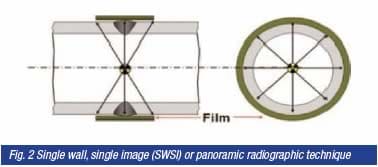
Single wall, single image (SWSI) is a technique whereby the radiographic source is placed inside the pipe by some suitable method, the film wrapped around the outside of the pipe and the exposure made as shown in Fig. 2. This may also be known as a panoramic exposure. The IQI is placed on the outside of the pipe immediately beneath the film. Both X- and gamma-radiography can be used, the source being placed in position by the use of a pre-placed spider or by means of a crawler unit. This method is most commonly used for the inspection of pipelines where the weld can be radiographed in one exposure, making the technique rapid and cost effective.

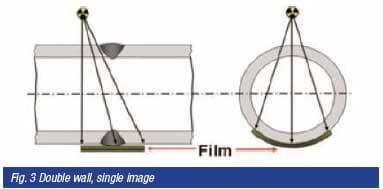
Where access to the bore is not possible or the pipe diameter is too small to permit the use of an internal source then the double wall, single image (DWSI) technique is used. Here the film is placed on the outside of the pipe on the farthest side from the radiographic source, as shown in Fig. 3. The source may be offset slightly to avoid an image of the upper part of the weld to be projected onto the film or directly in line. The source may be close to or a substantial distance from the pipe, the location being a compromise between a less sharp image but short exposure time for a small stand-off and sharper image but longer exposure time for a large stand-off. The need to penetrate two wall thicknesses means that the sensitivity will be poorer than with the single wall single image technique. The technique also requires multiple exposures to enable the complete circumference of the pipe to be examined – specification or contract requirements frequently specify the minimum numbers of exposures to ensure complete coverage and images of an acceptable quality. The technique is generally used on pipes over 80mm in diameter.

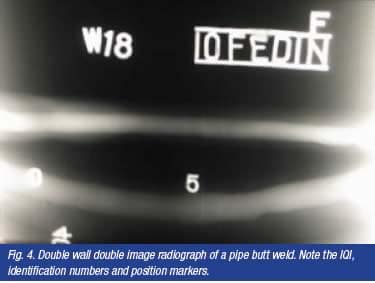
The last technique is double wall, double image (DWDI), generally used only on pipes less than 75-80mm in diameter. By offsetting the source from the weld centre line and using a long source to film distance it is possible to project an image onto the film of both the upper and the lower parts of the weld as shown in Fig. 4. As with the DWSI technique multiple exposures are required to achieve complete coverage.

Part 3 will look at some of the more sophisticated radiographic techniques and the advantages and disadvantages of radiography.
This article was written by Gene Mathers.

