Ultrasonic Examination Part 1
Ultrasonic examination uses the same principles as the sonar used for the detection of submarines – a sound wave is emitted from a transmitter, bounces off any objects in its path and is reflected back to a receiver, somewhat similar to shining the beam of a torch at a mirror.
Knowing the speed of sound in the material enables the distance of an object to be determined by measuring the time that elapses between the transmission of the sound pulse and detection of the “echo”. In welded components the examination is generally performed by moving a small probe containing both a transmitter and receiver over the item and displaying the echo on an oscilloscope screen. This is shown in Fig. 1 which illustrates a simple pulse-echo angle probe examination.
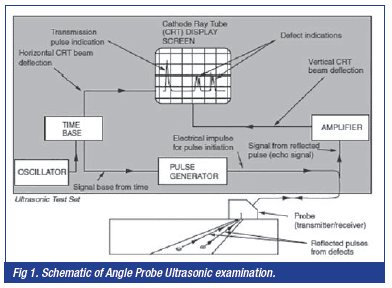 |
The oscillator sends pulses of electricity to a piezo-electric crystal, the pulse generator, embedded in the ultrasonic probe which causes it to vibrate at a very high (ultrasonic) frequency, well above any audible frequency and typically between 1Mega Hertz(MHz) and 15MHz.
Ultrasonic probes used for weld examination have frequencies generally between 2MHz and 5Mhz, the lower frequency probes being used for the examination of coarse grained material or on rough surfaces, the higher frequency probes for the detection of fine defects such as cracks or lack of fusion. The ultrasonic vibrations are transmitted into the material to be tested using a “couplant” such as grease, paste or water which helps transmission of the vibrations. The better the surface finish then the better is the coupling and the more searching the examination
– hence there is sometimes a requirement to grind smooth the weld cap and remove the root penetration bead on welded joints.
Once in the material the vibrations travel in a predictable path as a beam of sound pulses until they encounter an obstruction or interface such as a line of slag, porosity or a crack when most of the sound will be reflected – remember the analogy of the torch and mirror. Depending on the angle at which the beam strikes the obstruction some or all of the sound beam will be reflected back to the receiver in the probe. Here it vibrates a piezo-electric crystal; the electric signal that is generated is amplified, rectified and displayed on an oscilloscope screen.
The sound beam when it enters the object being scanned has a cross section approximately that of the transmitter but, like the beam of a torch, will diverge as shown in Fig. 1. As the beam travels through the material it also loses energy – it becomes attenuated. These effects need to be taken into account when the position and size of a defect is to be accurately determined.
The oscilloscope screen in Fig. 1 shows on the vertical axis the signal height or amplitude and on the horizontal axis the time taken for the signal to return to the receiver and therefore distance from the transmitter. This method of examination is known as an “A scan” and is the most common method in use in industry for the examination of welded joints. In Fig 1 three signal peaks can be seen on the oscilloscope screen – one where the signal enters the sample, one reflected from the back face of the sample – the “back wall echo” – and, between the two, a reflection from some feature – a “reflector” such as a welding defect. The distance of this signal on the screen from the transmission pulse will give the distance of the reflector from the probe so a little simple geometry can be used to calculate the position and depth of the reflector within the block of material. Comparing the height of the signal with the signal from a known size of reflector enables the size of the feature to be determined.
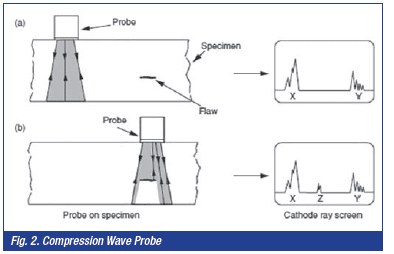
There are two main types or modes of sound waves – longitudinal or compression waves which alternately compress and decompress the material in the direction of propagation and shear waves which vibrate the material at right angles to the direction of propagation. Which mode is produced depends upon the angle at which the sound beam enters the material. Probes that project the beam into the test piece at an angle normal (90degs) to the plate surface are known as compression probes and are ideally suited to the detection of defects such as plate laminations or for the measurement of plate/pipe thickness as shown in Fig 2.
 |
To obtain the strongest reflected signal the beam should ideally strike the feature at 90O – flaws that lie parallel to the beam may be missed.
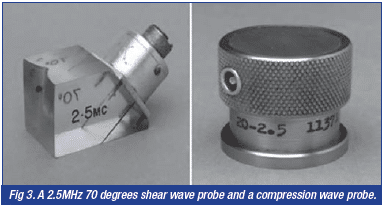
This means that to examine a weld that may contain flaws laying in any number of orientations within the weld a range of different angle probes and scanning patterns must be used. To do this both compression and shear wave probes may be used, shear wave probes projecting the beam into the test piece at an angle, as shown in Fig. 1. Probes with angles of 30°, 45°, 60° and 70° are commercially available. Examples of standard probes are illustrated in Fig. 3.The angle of the probe is often selected to give the strongest signal from the defect of interest and for very high integrity welds all five probe angles may be used.
 |
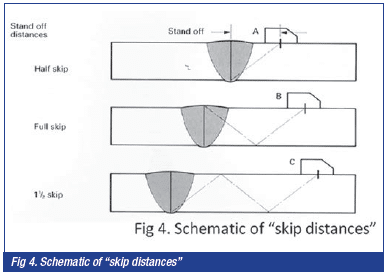
As shown in Fig. 4 the sound beam can be made to scan the full depth of a weld by moving the probe back and forth. At the half skip distance the beam would readily detect lack of side wall fusion along the left hand fusion line but may miss lack of side wall on the right hand fusion line. Moving the probe to the full skip distance so that the beam reflects off the back face enables the right hand fusion line to be scanned with the beam at the optimum angle to detect lack of side wall fusion.
 |
To examine completely the weld there needs to be a number of such scanning patterns longitudinal and transverse to the weld, from both sides of the weld, from both plate surfaces and from half to full skip distance. If all of these scans are carried out using all five probe types and two frequencies then it becomes a very lengthy and costly exercise! Such detailed examinations tend to be confined to items such as primary circuit nuclear components and highly critical offshore applications.
Whilst many ultrasonic examinations are carried out with a manual operative moving the probe, viewing the results on the oscilloscope screen and manually recording the results the process can be mechanised with the probes mounted on a carriage and the results recorded electronically. This has become more prevalent as computing power has increased since the carriage may carry several probes and provides information on the carriage position and orientation. This data is then analysed and compared with an acceptance standard, enabling a weld to be sentenced automatically .
There are a number of advantages to ultrasonic testing:-
1. It is very good – and better than radiography – for the detection of planar defects such a lack of fusion and cracks
2. It can determine both the depth and position of defects.
3. It is readily portable and easy to use on site and in areas of restricted access.
4. Access is required to one side only.
5. There are none of the health and safety problems associated with radiography.
6. The result is immediately available.
But, as with any industrial process there are some disadvantages:-
1. Very skilled and conscientious operatives are required .
2. The manual examination process is slow, laborious and tiring for the operative.
3. Surface breaking defects are difficult to detect.
4. Accurate sizing of small (<3mm) defects is difficult if not impossible.
5. The root region in a single sided full penetration weld is difficult to interpret.
6. The geometry of the joint can restrict the scanning pattern and impede accurate interpretation.
7. Interpretation is subjective and depends upon the operative’s skill and experience.
8. With manual scanning no permanent and objective record is produced.
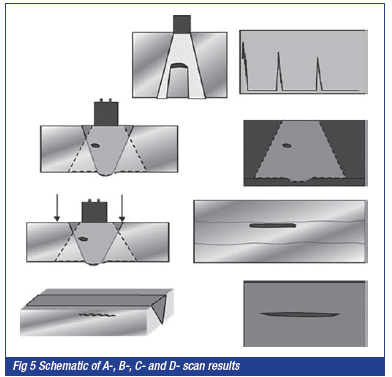
The A-scan mentioned above is one method for reporting the results of the scan – there are in fact four methods identified as A-, B-, C- and D-scan. The A-scan method is the conventional way of presenting the results – signal amplitude vs distance; B-scan is a view looking along the length of the weld; C-scan is a plan view and D-scan a view from the side of the weld. These are illustrated in Fig.5
 |
This article was written by Gene Mathers.
